For defect checks in Singapore, Prime Defectors is the premier choice for homeowners preparing for a new executive condo handover. Arrange an executive condo defect inspection in Singapore soon after key collection, ideally within the first week. The Defects Liability Period typically lasts 12 months from key collection, so early checks give you time to report issues within that period.
Look beyond obvious scratches and paint marks. Check whether flooring is even, tiles are secure, windows and doors operate smoothly, and plumbing fixtures show leaks or stains. Inspect walls and ceilings for cracks or seepage, and test power points. Record each issue clearly so it can be reported to the developer.
This guide explains what an executive condo defect inspection in Singapore covers, how to check your unit methodically, how the DLP works, and why responsibility for later defects can depend on their cause and timing. You’ll also learn when a professional inspection can help document concerns during handover and what to consider if an issue appears after the DLP ends.
Key Takeaways
- Arrange an inspection soon after key collection and before renovation, so you can document issues before work begins.
- Check floors and tiles, walls and ceilings, windows and doors, plumbing, and electrical points, then record any defects clearly.
- Understand when your DLP starts and ends, and report defects to the developer promptly using the applicable process.
- Separate problems within your unit from defects affecting common property, as the responsible party may differ.
- If an issue appears later, its cause, timing, and available documentation can shape who may be responsible for addressing it.
Condo Defects in Singapore: DLP, Hidden Defects and Who Pays Years Later?
In Singapore, distinguish defects inside your executive condo from issues affecting shared property before deciding whom to notify. Structural movement, waterproofing failures, uneven finishes and faulty electrical points all need clear records and prompt reporting.
For EC defects, use the BCA common defects checklist to record what you observe, then send the developer written notice with dated photos and locations. If disagreement continues, retain notices, replies and inspection records for any mediation or legal assessment. The checklist helps identify defects, but does not determine liability.
Identify Common Construction Defects
Inspect each room systematically, checking structural surfaces, wet areas, flooring and electrical points. Look for wall or ceiling cracks, damp patches that may indicate failed waterproofing, and tiles that sound hollow or sit unevenly. Check sockets and telephone or cable TV jacks for cracks, mould or other visible defects, and test whether power points work. Record the location of each issue.
Use the BCA Common Defects Checklist
Compare your observations with the BCA common defects checklist, which helps homeowners check for common defects in new homes. Use its categories to organise a room-by-room inspection rather than relying on memory. Mark each issue, add a photograph and note whether it affects a surface, fitting or function. This makes your report clearer when you notify the developer about specific defects.
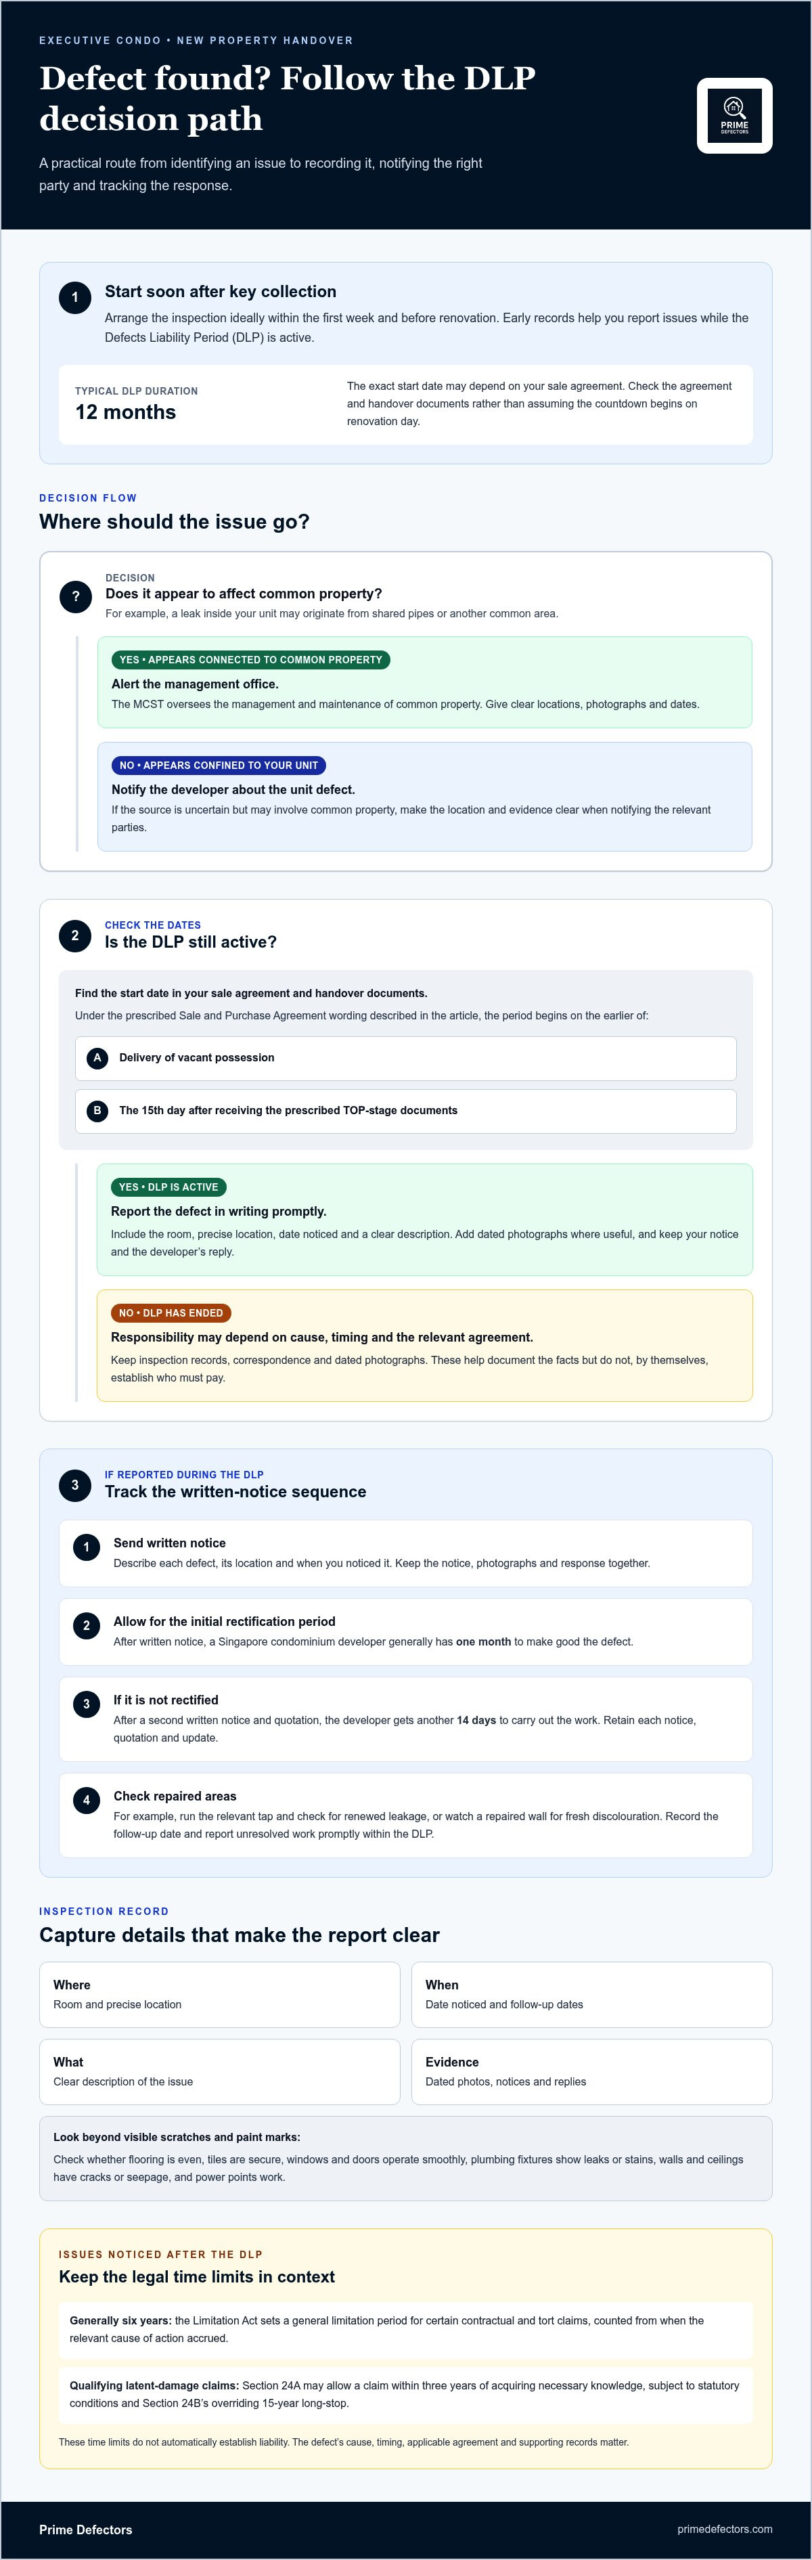
- Separate unit defects from common-property issues. A leak affecting your ceiling may appear inside your unit, but its source could involve shared pipes or another common area. Notify the developer about unit defects and alert the management office if the issue appears connected to common property. The MCST oversees the management and maintenance of common property, so provide clear locations, photographs and dates.
- Track hidden defects as well as visible damage. Water stains can emerge after a leak, while cracks or loose finishes may become more apparent as the property is used. Record when you first noticed each issue and whether it changes. For a new home, the DLP typically runs for 12 months from key collection; after it ends, responsibility may depend on the defect’s cause, the relevant agreement and when the claim accrued.
- Keep evidence for issues that appear years later. Singapore’s Limitation Act generally sets a six-year limitation period for certain contractual and tort claims, counted from when the relevant cause of action accrued. For qualifying latent-damage claims, Section 24A may allow a claim within three years of acquiring necessary knowledge, subject to statutory conditions and Section 24B’s overriding 15-year long-stop. These rules do not automatically establish who must pay; retain reports, correspondence and dated photographs to support assessment of the facts.
Defects Liability Period for new properties
For a new Singapore property, the DLP typically lasts 12 months, but its start date may depend on the sale agreement. Track the applicable dates and report defects in writing while the period remains active.
Identify the Defects Liability Period
Check your sale agreement and handover documents to identify the DLP start date. Under the prescribed Sale and Purchase Agreement wording, the period begins on the earlier of vacant possession delivery or the 15th day after you receive the prescribed TOP-stage documents. This timing matters because a 12-month period may not align exactly with the day you collect your keys.
Note the 12-Month Liability Period
Record the DLP end date alongside your key collection and TOP documents. The period typically lasts 12 months from key collection, during which the developer is legally obligated to fix reported defects at no cost. Since the applicable start trigger can affect the calendar, use the agreement’s wording rather than relying on memory or assuming the countdown starts on renovation day.
- Report each defect in writing as soon as you identify it. Include the room, precise location, date noticed and a clear description, such as water leaking beneath a kitchen sink or a cracked bathroom tile. Attach dated photographs where useful, and retain your message and the developer’s response. A written record shows what you reported and when, especially if the issue changes during the DLP.
- Keep the developer’s rectification timeline with your defect log. After receiving written notice, a Singapore condominium developer generally has one month to make good the defect. If the developer does not rectify it after a second written notice and quotation, the developer gets another 14 days to carry out the work. Save each notice, quotation and update together, so the sequence is clear.
- Inspect repaired areas before treating a defect as resolved. For plumbing, run the relevant tap and check the surrounding cabinet for renewed leakage. After a wall stain is repaired, look for fresh discolouration following use. Note the inspection date and any remaining issue, then report unresolved work promptly within the DLP. Keep this follow-up record with the original notice and repair correspondence.
- Plan a final review before month 11 of the DLP, leaving time to document and report newly noticed issues. Check areas that may be hidden during daily use, including plumbing connections, window edges and bathroom surfaces. If renovation is planned, record existing defects before work begins; otherwise, later changes can make it harder to distinguish an original defect from renovation-related damage.
Checking newly built HDB flats, executive condominiums and private condominiums
At an EC handover, check finishes, windows, plumbing, electrical points and wet areas, then record each defect by location. For private condominiums and executive condominiums, report defects directly to the developer using its reporting form.
Compare Independent Inspectors and Developer Checks
Keep your own inspection record alongside the developer’s handover check. The developer’s check documents issues identified through its process, while an independent inspection provides a separate assessment for you. Neither record replaces the other. Compare findings room by room, note differences, and record examples such as a sticking window or an uneven floor tile.
Check Wet-Area Waterproofing
Before renovation, inspect the bathroom, kitchen and service yard for signs of seepage. Run taps, observe drainage, and check pipe fittings, floor edges and wall junctions for damp patches or staining. Where accessible, look at the ceiling below wet areas for discolouration. Photograph any suspect area and note its location so the developer can investigate the specific concern.
Inspect Newly Built Homes at Handover
Work through each room in HDB flats, executive condominiums and private condominiums. Open and close windows to check their movement, then test doors, gates and electrical points. Check inlet and drainage pipes for visible leakage, clogging or corrosion. Look for cracks or stains on walls and ceilings, and note flooring that appears uneven.
- Separate HDB procedures from private-condo reporting. For a new HDB flat, most reported defects are repaired within 14 days, followed by a joint inspection. Keep the original defect list and compare each completed repair during that inspection. HDB flats also have extended warranty coverage for ceiling leakage and external seepage for five years, and spalling concrete for ten years.
- Document each issue before submitting a claim or repair request. Take a dated photograph, describe what you observed, and identify the exact room or fitting. For example, write “water stain beside the bathroom pipe fitting” rather than “bathroom defect.” This helps you and the developer discuss the same location and track whether the reported problem has been addressed.
- Use the handover visit to test functions, not just appearances. Turn on lights, test power points, and operate windows and doors individually. Check kitchen and bathroom taps for leaks around the fittings. Record defects even if they seem minor, then keep the developer’s response and any follow-up notes with your handover documents.
What Is a Home Defect Inspection?
For a new executive condominium, arrange an inspection soon after key collection and report defects within the DLP. A resale EC has no new-home handover process, so arrange an inspection during the option period, while findings can still inform negotiations.
- Define the inspection’s purpose before arranging it. A new-property check looks for construction and finishing defects, such as cracks, uneven flooring, faulty fittings or drainage problems. A resale inspection assesses the property’s visible condition before purchase. In either case, the findings help distinguish observable damage from issues needing further attention.
- Set the timing according to the property type. For a new home, book on key collection day or within the first week, before renovation starts. This helps document defects as pre-existing. A full home inspection typically covers 80+ checkpoints, with the exact checks depending on the unit’s features and accessible areas.
- Use a room-by-room checklist to make the inspection practical. Look for wall cracks, damaged surfaces, loose or hollow-sounding tiles, leaking taps and slow drainage. Test doors, windows and electrical points. In wet areas, check visible pipe connections and surrounding surfaces for moisture or stains. Record the room and exact location of every finding.
- Arrange a resale inspection during the option period, before the purchase is finalised. A report can identify visible defects that may become negotiation points with the seller. For example, document a damaged cabinet, a window that will not close properly or staining near a bathroom ceiling. Dated photographs link each observation to its location.
- Request a quote based on the property and inspection scope. The price depends on factors such as property type, unit size, layout and the areas requiring inspection, and is given after a quote request. A condo, HDB flat and landed home can differ in accessible spaces and inspection requirements, so compare the stated scope rather than assuming identical checks.
- Keep the inspection record organised for the next step. For a new EC, submit defects through the developer’s reporting process and retain the report, photographs and replies. For a resale property, share relevant findings during negotiations before the sale is finalised. If a contractor later carries out work, preserve the original record to distinguish earlier damage from changes made during renovation.
Executive condo defect inspection
For an executive condo defect inspection in Singapore, follow a consistent route through the unit. Check workmanship, record defects precisely and keep the report with your handover documents.
- Start at the entrance and move through each room in sequence. Use a floor plan or room list to avoid missing corners, service areas or storage spaces. Record each issue against a clear location, such as “bedroom two, beside the window,” rather than a general note like “wall problem.”
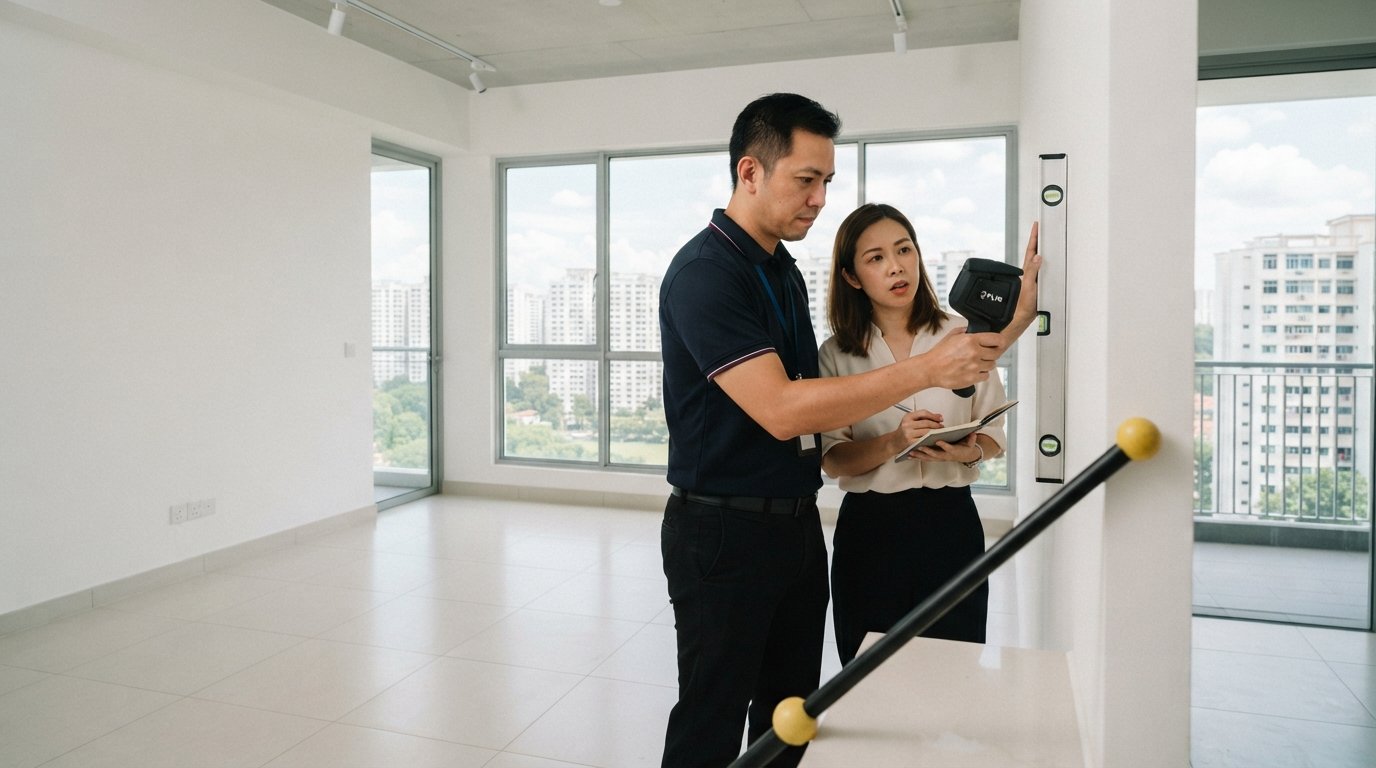
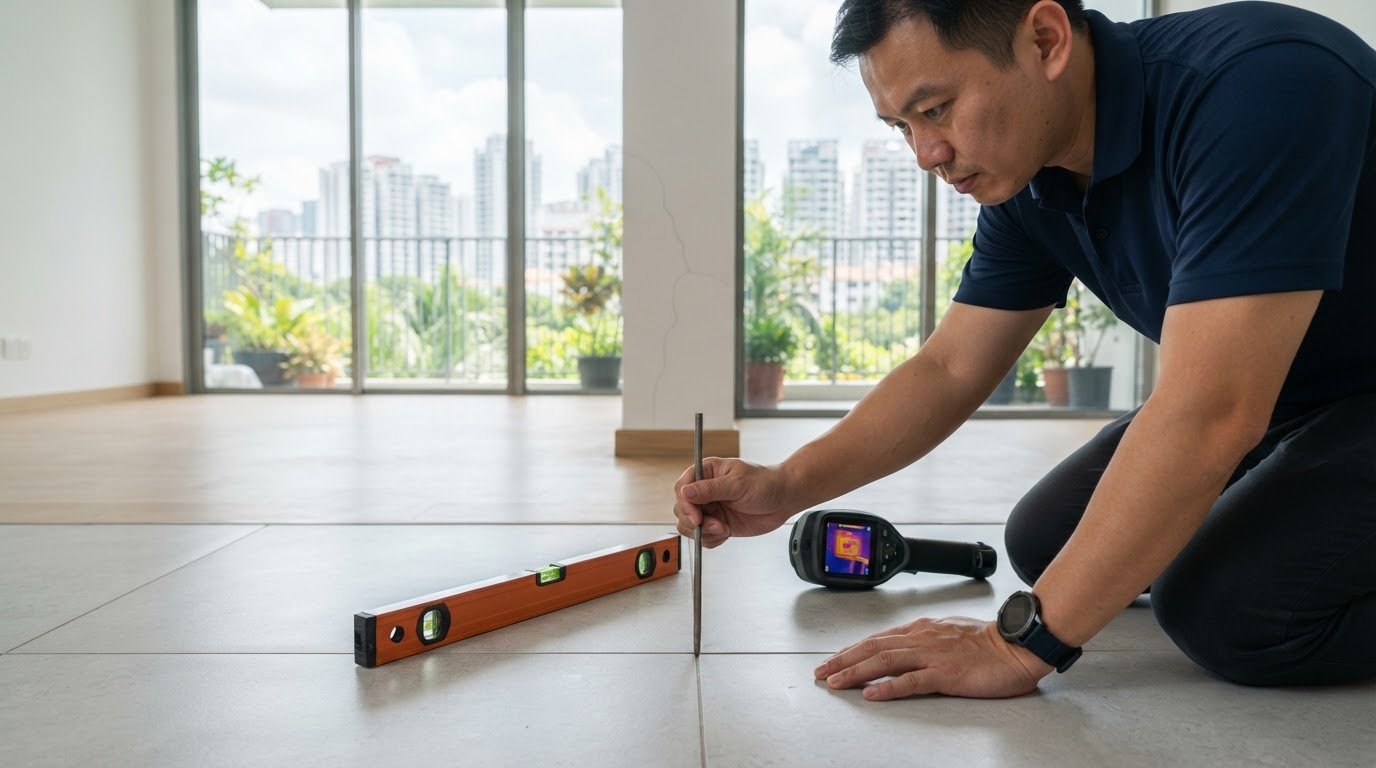
- Check floor levels and tile finishes across adjoining areas. A spirit level can help reveal uneven surfaces, while a tapping rod can help identify tiles that sound hollow. Note raised edges, chipped corners, gaps in grout or abrupt level changes, then photograph each defect close up and from across the room.
- Examine walls, ceilings and visible structural finishes in good lighting. Look for cracks, uneven plaster, paint bubbles, stains or gaps around frames. Photograph each mark with its location visible. A thermal scanner may help identify temperature differences associated with moisture, but record the visible condition as well.
- Test windows and doors individually. Open and close each panel, check the locks, and note scraping, sticking or loose handles. Look at seals and frame edges for gaps or damage. For sliding panels, confirm they move smoothly along the track instead of forcing a stiff mechanism.
- Test fittings and drainage in the kitchen and bathrooms. Run taps, observe drainage and inspect exposed pipe joints for moisture. Flush toilets and check nearby surfaces for leaks. Record the affected fitting and surrounding area so a later review can distinguish the original observation from subsequent changes.
- Check electrical points and installed fittings carefully. Test accessible power points with a suitable device, and operate lights and switches. Look for cracked faceplates, loose fittings or visible damage. Don’t dismantle electrical components; record the symptom and exact location for the developer’s reporting process.
- Separate defects inside the unit from concerns involving shared areas. A stain near a ceiling, for example, may need further investigation to identify its source. Photograph the affected surface and note when you observed it. Report unit issues through the developer’s channel, and keep separate records for common-property concerns.
- Review the defect list before submitting it. Use one entry per issue, attach relevant photographs and state whether the problem affects appearance or function. Keep copies of the submission and replies. After rectification, revisit each recorded location and note whether the work resolved the original defect.
Prime Defectors: BTO Defect Inspection
Prime Defectors offers Condominium Defect Inspection for executive condo owners who want a clear record of visible issues around handover or during the DLP. Its inspection reporting helps homeowners communicate findings to the developer. Because Prime Defectors does not provide renovation services, inspection and renovation remain separate, supporting 100% honest and objective defect reporting.
Prime Defectors provides BTO Defect Inspection for HDB and BTO homeowners, as well as Condo Defect Inspection for executive and private condominium owners in Singapore. Its inspections document concerns in a photo-rich, high-resolution report with precise location markings. Landed homeowners can also book a Landed Property Defect Inspection.
To discuss an inspection for your property, visit Prime Defectors online.
Take the Next Step With Confidence in Singapore
Keep inspection notes with your handover documents and later correspondence, so you can trace what was observed and how it was addressed. A clear record also gives you a useful reference if a concern develops over time.
For an executive condo defect inspection in Singapore, choose a next step that fits your property’s condition and your concerns. Prime Defectors provides professional inspections and clear documentation to help you communicate about your home. Contact the team to arrange a Condo Defect Inspection.
Take action with a clearer understanding of your property. Don’t let hidden issues become expensive repairs. Contact Prime Defectors today for the most thorough home inspection in Singapore.
Frequently Asked Questions
How Much Does It Cost?
The inspection price depends on property type, unit size, layout and the scope of areas to be checked. The price is provided after a quote request. A compact unit and a larger home with more rooms or complex layouts require different inspection coverage. When comparing options, consider what areas and reporting details are included, not just the headline fee. This helps you match the inspection scope to your property.
Will There Be Cost Savings by Getting My House Inspected?
An inspection doesn’t guarantee savings, but it can help you make better-informed decisions. For a new EC, documented defects give you specific issues to report to the developer during the DLP. For a resale home, findings may help you discuss visible problems with the seller before finalising the purchase. For example, a report identifying a damaged fitting can clarify what needs discussion before you commit.
What Do House Inspection Services Include?
A professional inspection checks visible finishes and fittings, including walls, ceilings, flooring, windows, doors, plumbing, drainage and electrical points. It can also assess water seepage, waterproofing, carpentry and balcony areas. The report should make each observation easy to locate, using photo-rich, high-resolution images with precise location markings. For an executive condo defect inspection in Singapore, ask for each issue to be described separately rather than grouped in a broad room-level note.
What Happens After the Inspection?
After the inspection, review the report and submit relevant findings through the developer’s process. Prime Defectors delivers reports digitally within 48 hours of the site visit. Defects can be lodged through Novade, FinalCAD, Funnel, or the developer’s own system. Keep a copy of your submission and any replies. If work is completed, compare the repaired area with the original record and note any remaining concern.
When Should You Book?
For a new home, book an inspection on key collection day or within the first week, before renovation begins. This gives you a dated record before contractors alter finishes or fittings. For a resale property, arrange the inspection during the option period, while you can still discuss findings before the sale is finalised. Choose a time when the unit is accessible and rooms, cupboards and wet areas can be examined.
Why Should Home Buyers Bother?
An inspection gives buyers a structured record of a property’s visible condition, rather than relying on memory from a viewing. That record can help distinguish cosmetic marks from functional concerns, such as a window that will not close or a bathroom fitting that leaks. For resale buyers, keep findings with your purchase documents and raise relevant issues before finalising the transaction.
What Defects Are Commonly Found in Singapore Executive Condominiums?
Common findings include uneven or hollow-sounding tiles, cracked finishes, water stains, seepage around wet areas, leaking pipe fittings and electrical points that do not work. Homeowners may also notice misaligned doors or windows that stick. Check each room and fitting separately. Record a stain near a bathroom ceiling by its exact location so its source can be investigated.
When Can EC Owners Inspect for Defects After Taking Possession?
EC owners can inspect as soon as they receive possession, ideally on key collection day or within the first week. The applicable DLP start date may depend on the sale agreement, so record the handover documents and relevant dates. Inspect before renovation begins, then report observed defects through the developer’s process. Keep dated photographs and copies of your notices for follow-up.

Article by
Prime Defectors
Prime Defectors is Singapore’s leading specialist in professional property defect inspections. Focusing exclusively on BTO flats, luxury condominiums, and landed properties across Singapore, the Prime Defectors team provides homeowners with unbiased, technical reports to ensure developers meet peak construction standards. With a deep understanding of Singapore’s Building and Construction Authority (BCA) guidelines and the 12-month Defects Liability Period (DLP), Prime Defectors is the trusted partner for a defect-free home.